REST API with ASP.NET Core

When you are creating a web application, you need to organize communication between different parts of the app (frontend and backend or between microservices or something else). There are some new exciting mechanism to do that: GraphQL, gRPC. I want to dive into these technologies in the future posts, but today let’s start with basics!
REST
What is REST? There are plenty of articles about it so that I won’t go much into details. REST (REpresentational State Transfer) is an architectural style, set of rules for web services:
- Client-server – we need two systems to communicate with each other;
- Stateless – the server doesn’t keep state of the client between requests;
- Cacheable – the client can store response from the server in the cache;
- Layered system – the server can have some intermediate layers (for example, proxy or load balancer) and the client doesn’t know about them;
- Code on demand (optional) – the server can extend client’s functionality by sending him executable code (applets or scripts);
- Uniform interface – it consists of four constraints (resource identification in requests, resource manipulation through representations, self-descriptive messages and hypermedia as the engine of application state).
Not all systems fulfill these rules; there is a maturity model defined by Leonard Richardson.
Roy Fielding, the creator of REST, describes this style in his dissertation as follows:
REST provides a set of architectural constraints that, when applied as a whole, emphasizes scalability of component interactions, generality of interfaces, independent deployment of components, and intermediary components to reduce interaction latency, enforce security, and encapsulate legacy systems.
RESTful APIs are very popular, because of performance, scalability and simplicity. REST doesn’t specify any transport or format, but it is used mostly with HTTP and JSON.
REST Server
Ok, let’s do some code. To start with, we’ll create a simple server. I’ve added an example on my GitHub, you can find it here.
Begin a new project with dotnet new web. After that, add ArticleController and modify Startup. Also, you can create an ArticleService to keep articles between requests.
[ApiController]
[Route("api/[controller]")]
public class ArticleController : ControllerBase
{
    private readonly ArticleService _articleService;

    public ArticleController(ArticleService articleService)
    {
        _articleService = articleService;
    }

    [HttpPost("create")]
    public void CreateArticle(Article article)
    {
        _articleService.Articles.Add(article);
    }

    [HttpGet("list")]
    public List<Article> GetArticles()
    {
        return _articleService.Articles;
    }
}
public class Startup
{
    public void ConfigureServices(IServiceCollection services)
    {
        services.AddControllers();
        services.AddSingleton<ArticleService>();
    }

    public void Configure(IApplicationBuilder app, IWebHostEnvironment env)
    {
        app.UseRouting();

        app.UseEndpoints(endpoints =>
        {
            endpoints.MapControllers();
        });
    }
}
public class ArticleService
{
    public readonly List<Article> Articles;

    public ArticleService()
    {
        Articles = new List<Article>();
    }
}
Our server is ready, start it with a command dotnet run. For testing purposes, we need a client which sends requests to the server.
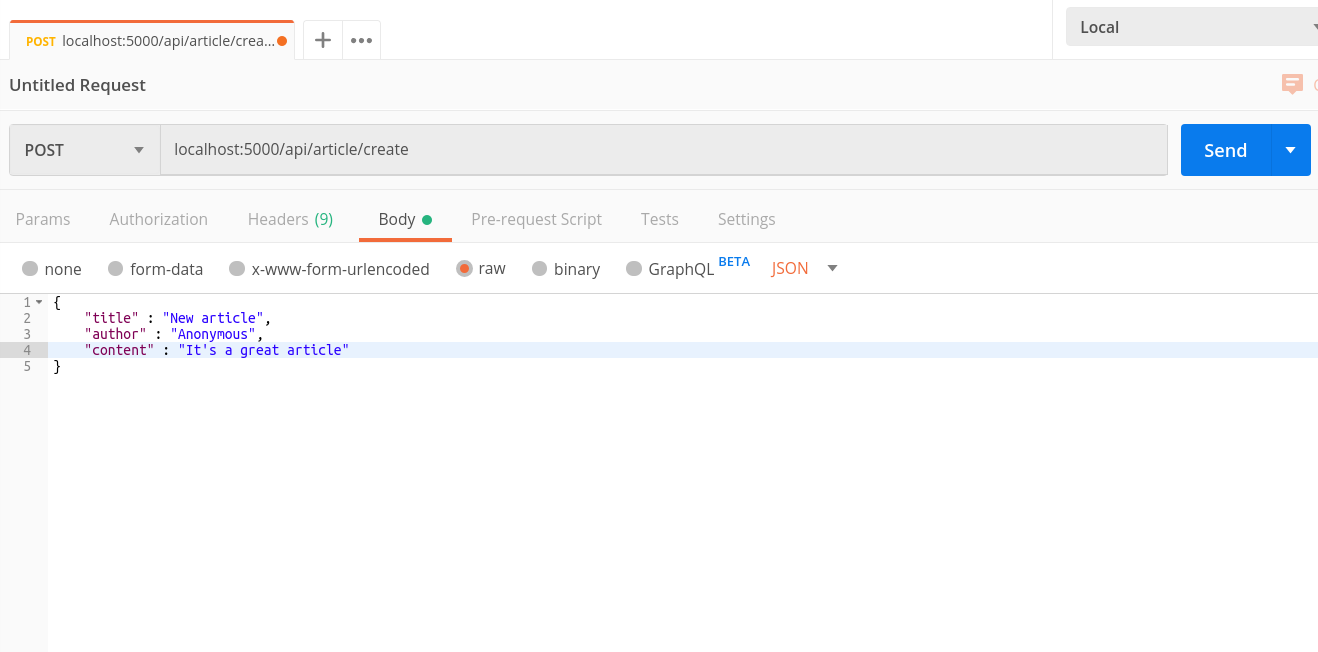
There is a great powerful tool to work with API called Postman. Post a new article to localhost:5000/api/article/create.
And get the list of articles from localhost:5000/api/article/list.
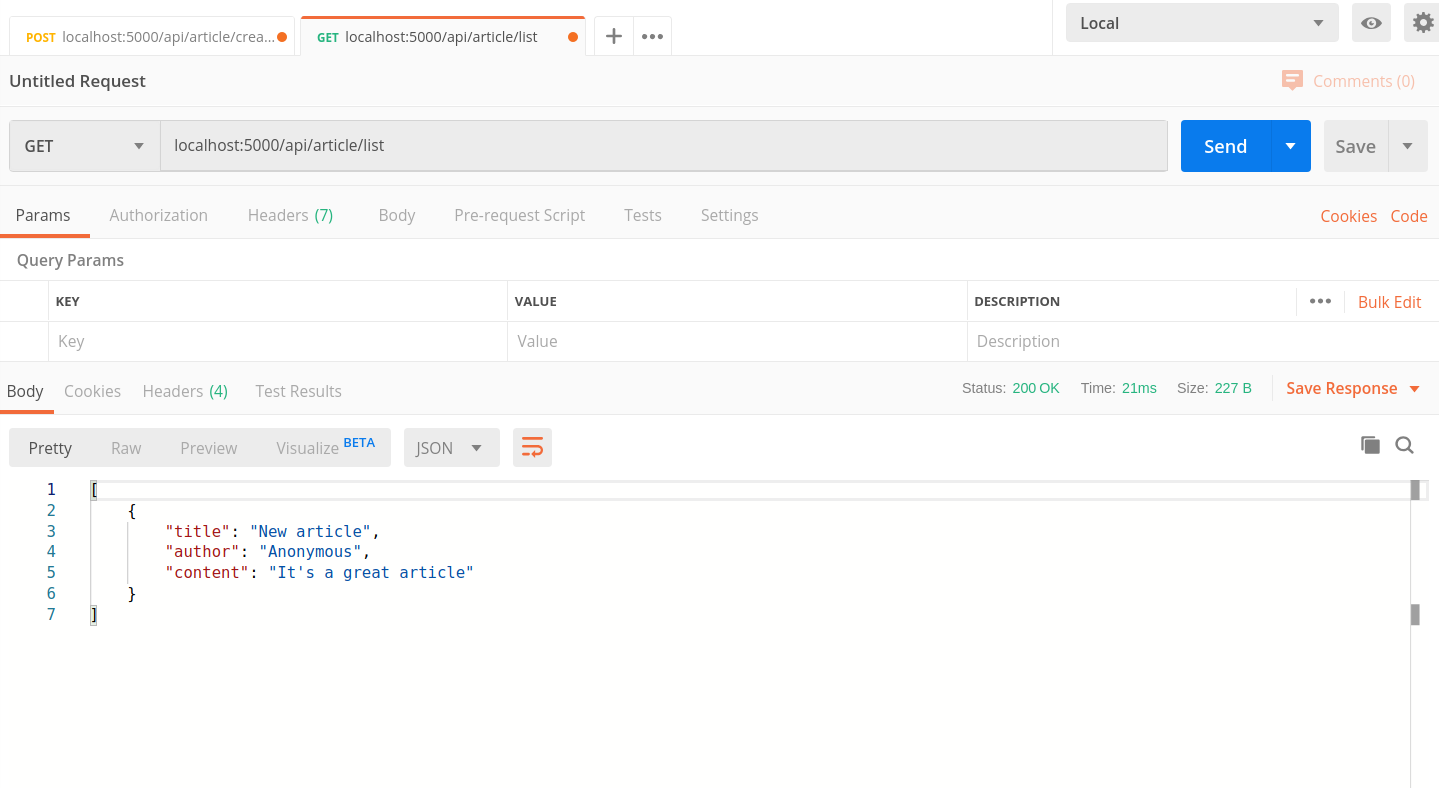
Great, everything is working. Let’s go to the next stage.
REST Client
Now, we’ll create our own client for API. You can use HttpClient for these purposes. There is excellent documentation about making http requests.
Start a new project with dotnet new worker. Firstly, we need to add to the service collection HttpClientFactory, which allows us to create HttpClient. You should add Microsoft.Extensions.Http package to your project and modify Program.cs.
public static IHostBuilder CreateHostBuilder(string[] args) =>
    Host.CreateDefaultBuilder(args)
        .ConfigureServices((hostContext, services) =>
        {
            services.AddHostedService<Worker>();
            services.AddHttpClient("localhost", c =>
            {
                c.BaseAddress = new Uri("http://localhost:5000");
                c.DefaultRequestHeaders.Add("Accept", "application/json");
            });
        });
After that, add logic to your worker service. I’ve made a naive console application, for more complicated logic you can use, for example, System.CommandLine. Our goal is to consume server API in an elementary form.
public class Worker : BackgroundService
{
private readonly IHttpClientFactory _factory;
private const string CreateCommand = "create";
private const string GetListCommand = "get-list";
public Worker(IHttpClientFactory factory)
{
_factory = factory;
}
protected override async Task ExecuteAsync(CancellationToken stoppingToken)
{
while (!stoppingToken.IsCancellationRequested)
{
Console.WriteLine("Type a command.");
var command = Console.ReadLine();
if (command != CreateCommand && command != GetListCommand)
{
Console.WriteLine("Wrong command. Try again.");
continue;
}
var client = _factory.CreateClient("localhost");
if (command is GetListCommand)
{
using var response = await client.GetAsync("api/article/list", stoppingToken);
var content = await response.Content.ReadAsStringAsync();
var articles = JsonSerializer.Deserialize<List<Article>>(content, new JsonSerializerOptions {PropertyNameCaseInsensitive = true});
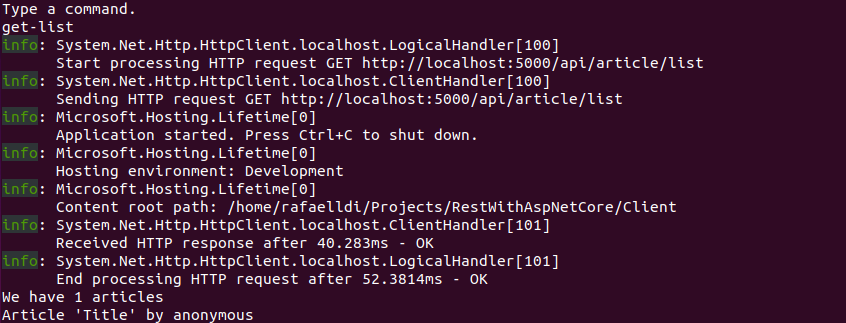
Console.WriteLine($"We have {articles.Count} articles");
foreach (var article in articles)
{
Console.WriteLine($"Article '{article.Title}' by {article.Author}");
}
} else if (command is CreateCommand)
{
Console.WriteLine("Type a title");
var title = Console.ReadLine();
Console.WriteLine("Type an author");
var author = Console.ReadLine();
Console.WriteLine("Type a content");
var content = Console.ReadLine();
var article = new Article {Title = title, Author = author, Content = content};
var jsonArticle = JsonSerializer.Serialize(article);
using var jsonContent = new StringContent(jsonArticle, Encoding.UTF8, "application/json");
await client.PostAsync("api/article/create", jsonContent, stoppingToken);
}
}
}
}
I use Console.ReadLine() to read commands from a user and create GET or POST request based on his choice.
Ok, maybe we need to hide information level logs.
We can improve our client with a magnificent library Refit. It helps you to create REST clients easily. Add this nuget package Refit.HttpClientFactory, describe our API with IArticlesApi interface and register Refit in the service collection.
public interface IArticlesApi
{
    [Get("/api/article/list")]
    Task<List<Article>> GetArticlesList();
    [Post("/api/article/create")]
    Task CreateArticle(Article article);
}

public static IHostBuilder CreateHostBuilder(string[] args) =>
    Host.CreateDefaultBuilder(args)
        .ConfigureServices((hostContext, services) =>
        {
            services.AddHostedService<WorkerWithRefit>();
            services.AddRefitClient<IArticlesApi>()
                .ConfigureHttpClient(c => c.BaseAddress = new Uri("http://localhost:5000"));
        });
There is a modified code for the worker service. As you can see, now we don’t have to serialize or deserialize json manually, we use methods of the declared interface. As for me, it’s a more precise approach.
public class WorkerWithRefit : BackgroundService
{
    private readonly IArticlesApi _articlesApi;
    private const string CreateCommand = "create";
    private const string GetListCommand = "get-list";

    public WorkerWithRefit(IArticlesApi articlesApi)
    {
        _articlesApi = articlesApi;
    }

    protected override async Task ExecuteAsync(CancellationToken stoppingToken)
    {
        while (!stoppingToken.IsCancellationRequested)
        {
            Console.WriteLine("Type a command.");
            var command = Console.ReadLine();
            if (command != CreateCommand && command != GetListCommand)
            {
                Console.WriteLine("Wrong command. Try again.");
                continue;
            }

            if (command is GetListCommand)
            {
                var articles = await _articlesApi.GetArticlesList();
                Console.WriteLine($"We have {articles.Count} articles");
                foreach (var article in articles)
                {
                    Console.WriteLine($"Article '{article.Title}' by {article.Author}");
                }
            } else if (command is CreateCommand)
            {
                Console.WriteLine("Type a title");
                var title = Console.ReadLine();
                Console.WriteLine("Type an author");
                var author = Console.ReadLine();
                Console.WriteLine("Type a content");
                var content = Console.ReadLine();

                var article = new Article {Title = title, Author = author, Content = content};
                await _articlesApi.CreateArticle(article);
            }
        }
    }
}
Contracts
When you create server and client simultaneously, you know all endpoints and can easily request them. But what if you don’t own server application and can’t see the source code. There is an OpenAPI Specification (Swagger) which allows you to generate a contract for your API in a standard way and consume it when you’re creating a client. In this section, I’ll show you how to generate documentation from your server code and produce a client.
There are two libraries in ASP.NET Core for it NSwag and Swashbuckle. I’m using the first one.
Install NSwag.AspNetCore package to your project and add new lines to Startup.cs.
public class Startup
{
    public void ConfigureServices(IServiceCollection services)
    {
        services.AddControllers();
        services.AddSingleton<ArticleService>();
        services.AddOpenApiDocument();
    }

    public void Configure(IApplicationBuilder app, IWebHostEnvironment env)
    {
        app.UseOpenApi();
        app.UseSwaggerUi3();
        app.UseRouting();

        app.UseEndpoints(endpoints =>
        {
            endpoints.MapControllers();
        });
    }
}
And that’s all. Go to http://localhost:5000/swagger/v1/swagger.json and check the generated documentation.
{
  "x-generator": "NSwag v13.1.6.0 (NJsonSchema v10.0.28.0 (Newtonsoft.Json v9.0.0.0))",
  "openapi": "3.0.0",
  "info": {
    "title": "My Title",
    "version": "1.0.0"
  },
  "servers": [
    {
      "url": "http://localhost:5000"
    }
  ],
  "paths": {
    "/api/Article/create": {
      "post": {
        "tags": [
          "Article"
        ],
        "operationId": "Article_CreateArticle",
        "requestBody": {
          "x-name": "article",
          "content": {
            "application/json": {
              "schema": {
                "$ref": "#/components/schemas/Article"
              }
            }
          },
          "required": true,
          "x-position": 1
        },
        "responses": {
          "200": {
            "description": ""
          }
        }
      }
    },
    "/api/Article/list": {
      "get": {
        "tags": [
          "Article"
        ],
        "operationId": "Article_GetArticles",
        "responses": {
          "200": {
            "description": "",
            "content": {
              "application/json": {
                "schema": {
                  "type": "array",
                  "items": {
                    "$ref": "#/components/schemas/Article"
                  }
                }
              }
            }
          }
        }
      }
    }
  },
  "components": {
    "schemas": {
      "Article": {
        "type": "object",
        "additionalProperties": false,
        "properties": {
          "title": {
            "type": "string",
            "nullable": true
          },
          "author": {
            "type": "string",
            "nullable": true
          },
          "content": {
            "type": "string",
            "nullable": true
          }
        }
      }
    }
  }
}
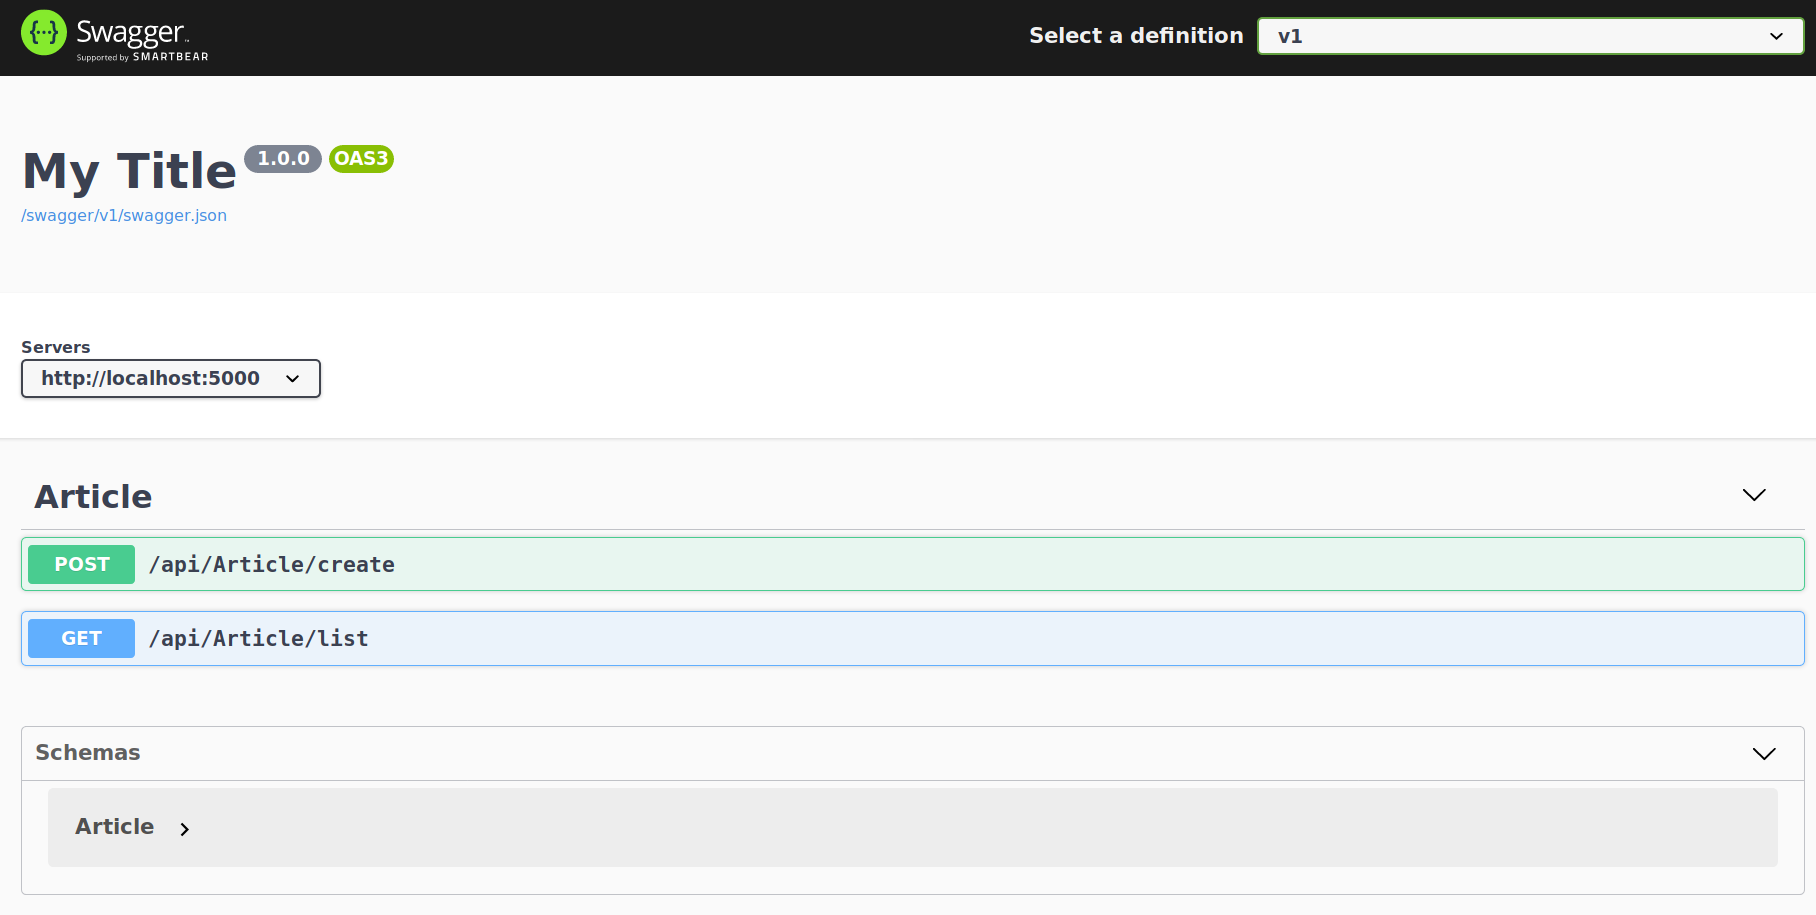
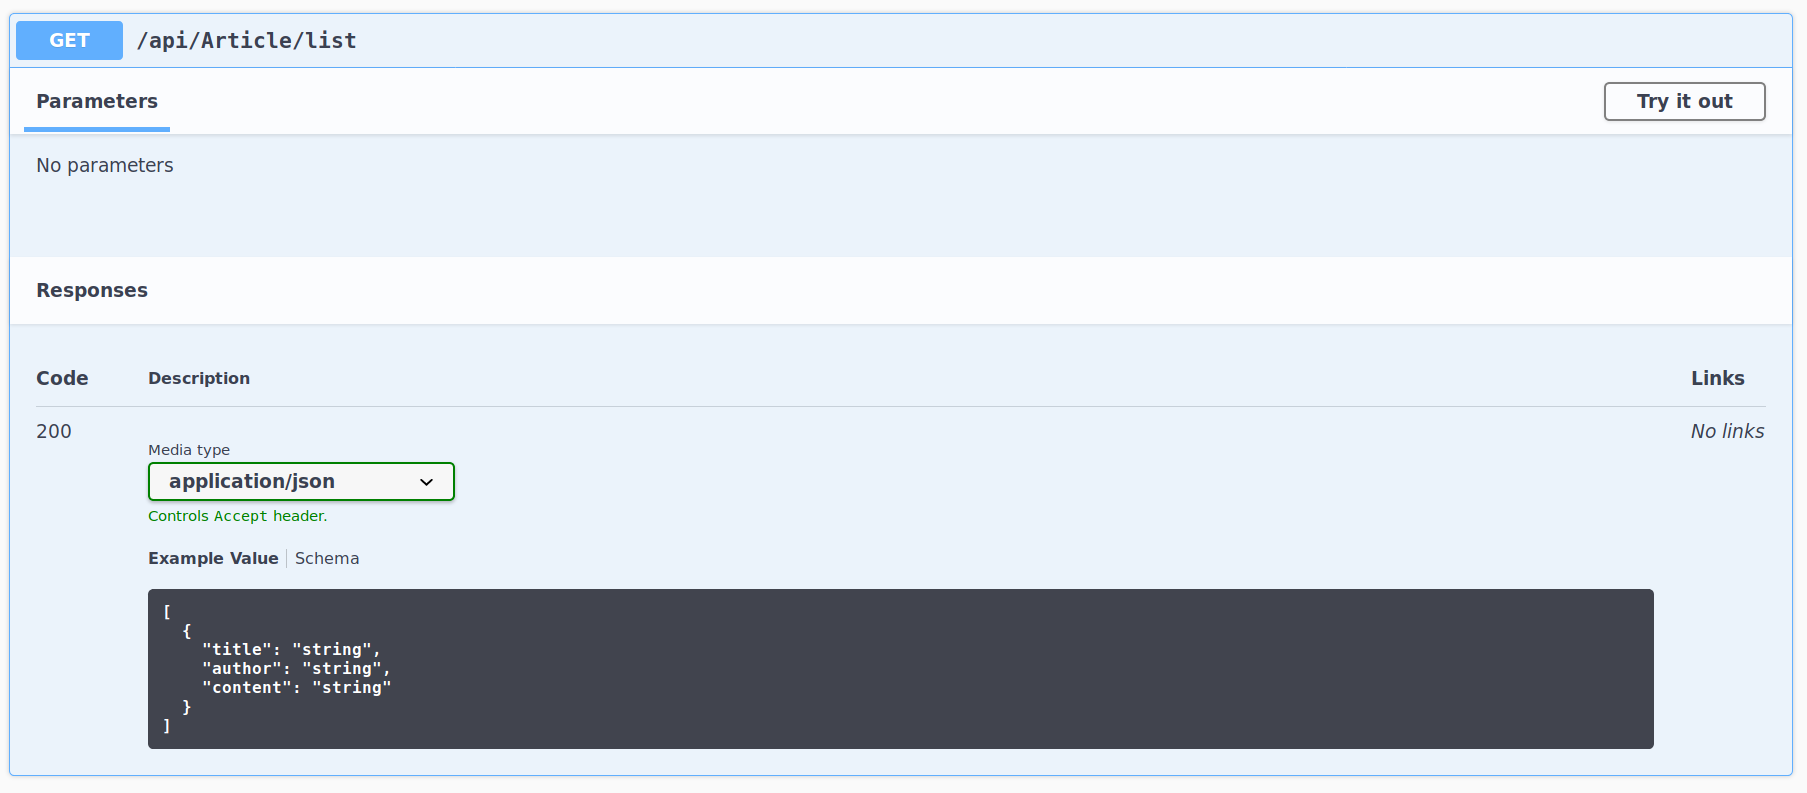
The best part is that NSwag also generates an interface that allows you to see all your endpoints and interact with them. If you have a public API, you can give to your consumers this page instead of extended text documentation. Go to http://localhost:5000/swagger/index.html to see it.
Next step is to develop a client for this API, but there is a better option. Let’s generate it!
Firstly, you need to install Microsoft.dotnet-openapi global tool with
dotnet tool install -g Microsoft.dotnet-openapi
After that, create a client project and call a method
dotnet openapi add url -p ./GeneratedWithGlobalTool.csproj --output-file BlogApi.json http://localhost:5000/swagger/v1/swagger.json
(where option -p is a project file, output-file is a location for the OpenAPI document copy and the last option is an URL of the OpenAPI contract). It downloads the contract, generates a partial class BlogApiClient.cs from it in the obj folder. Also, it adds this line to your project file.
<ItemGroup>
  <OpenApiReference Include="BlogApi.json" SourceUrl="http://localhost:5000/swagger/v1/swagger.json" />
</ItemGroup>
Create an empty BlogApiClient class.
public partial class BlogApiClient
{
}
Now you can use methods from the API. I show you a simple example.
public class Program
{
    public static async Task Main(string[] args)
    {
        var client = new BlogApiClient(new HttpClient());
        Console.ReadKey();
        var newArticle = new Article { Title = "Title", Author = "Author", Content = "Content"};
        await client.CreateArticleAsync(newArticle);
        Console.ReadKey();
        var articles = await client.GetArticlesAsync();
        foreach (var article in articles)
        {
            Console.WriteLine($"Article '{article.Title}' by {article.Author}");
        }
    }
}
The full project is available on my GitHub. Also, you can read documentation from here.
Contracts-first approach
There is another exciting approach called contracts-first. If you have two developers and they’re working on server and client separately (for example, in a microservice architecture), this approach may be suitable.
Firstly, developers create together comprehensible yaml or json contract. Here is an example.
openapi: 3.0.0
info:
  title: Blog API
  description: API for working with blog
  version: 1.0.0
servers:
  - url: http://localhost:5000
    description: Localhost server
paths:
  /api/article/create:
    post:
      summary: Create a new article in a blog.
      requestBody:
        required: true
        content:
          application/json:
            schema:
              type: object
              properties:
                title:
                  type: string
                author:
                  type: string
                content:
                  type: string
      responses:
        '200':
          description: Create
  /api/article/list:
    get:
      summary: Return a list of articles.
      responses:
        '200':
          description: A JSON array of articles
          content:
            application/json:
              schema:
                type: array
                items:
                  type: object
                  properties:
                    title:
                      type: string
                    author:
                      type: string
                    content:
                      type: string
As you see, it is straightforward and understandable description. After that, let NSwag do his job and generate a code. Start a new library project with dotnet new classlib and add this yaml file to it. Next, you need to modify csproj file.
<Project Sdk="Microsoft.NET.Sdk">

  <PropertyGroup>
    <TargetFramework>netcoreapp3.0</TargetFramework>
  </PropertyGroup>

  <ItemGroup>
    <PackageReference Include="Newtonsoft.Json" Version="12.0.3" />
    <PackageReference Include="NSwag.MSBuild" Version="13.1.6" />
  </ItemGroup>

  <ItemGroup>
    <FrameworkReference Include="Microsoft.AspNetCore.App" />
  </ItemGroup>

  <ItemGroup>
    <None Remove="Contract.yaml" />
    <Content Include="Contract.yaml">
      <CopyToOutputDirectory>Always</CopyToOutputDirectory>
    </Content>
  </ItemGroup>

  <Target Name="NSwag" BeforeTargets="PrepareForBuild" Condition="'$(GenerateCode)'=='True'">
    <Exec Command="$(NSwagExe_Core30) openapi2csclient /input:Contract.yaml /namespace:Generated.Client /classname:ArticleClient /output:ArticleClient.cs" />
    <Exec Command="$(NSwagExe_Core30) openapi2cscontroller /input:Contract.yaml /namespace:Generated.Controller /classname:ArticleController /output:ArticleController.cs /controllerBaseClass:Microsoft.AspNetCore.Mvc.ControllerBase /controllerStyle:abstract" />
  </Target>

</Project>
Eventually, build your project with a command dotnet build /p:GenerateCode=True. NSwag generates controller and client from the contract, and your developers can add this library to their projects and use prepared code. Also, NSwag can generate code for a typescript client. More options you can read here.
I don’t put here samples with code, because they are too long, but you can find them in my repository.
HTTP REPL
In the end, I want to mention a handy tool for testing your API called dotnet-httprepl global tool. To start with, let’s install this package.
dotnet tool install -g Microsoft.dotnet-httprepl
After installation, you can start with httprepl command. Navigate across your API in the same manner as in the file system and call some endpoints. I won’t delve into this topic, because there is comprehensive documentation. I show you some requests with their outputs.
httprepl http://localhost:5000
Using a base address of http://localhost:5000/
Using swagger definition at http://localhost:5000/swagger/v1/swagger.json

http://localhost:5000/> cd ./api/Article
http://localhost:5000/api/Article> ls
.        []
..       []
create   [POST]
list     [GET]

http://localhost:5000/api/Article> cd ./create
/api/Article/create    [POST]

http://localhost:5000/api/Article/list> post -h Content-Type=application/json -c "{"title":"Title", "author":"Author", "content":"Content"}"
HTTP/1.1 200 OK
Content-Length: 0
Date: Sun, 19 Jan 2020 10:05:01 GMT
Server: Kestrel

http://localhost:5000/api/Article/create> cd ../list
/api/Article/list    [GET]

http://localhost:5000/api/Article/list> get
HTTP/1.1 200 OK
Content-Type: application/json; charset=utf-8
Date: Sun, 19 Jan 2020 10:05:14 GMT
Server: Kestrel
Transfer-Encoding: chunked

[
  {
    "title": "Title",
    "author": "Author",
    "content": "Content"
  }
]
Summary
Today we’ve created a restful system with server and client. I showed a simple example, but it not so difficult to do a more sophisticated one. Also, I explained, what is OpenAPI and how contracts can help you in developing your systems.
Image: Photo by Kristina Tripkovic on Unsplash
Comments