WebSockets in .NET

In this article, I want to discuss a WebSocket protocol. I’m going to tell you the purposes of this protocol, the differences between HTTP. Finally, we’ll create a basic example in .NET to demonstrate how it works.
Overview
The WebSocket protocol provides full-duplex communication over a TCP connection. Thus, this protocol is used for real-time asynchronous data transfer.
If the state of the server is changing and you need to inform the client about these changes, WebSocket, probably, will be your best choice. What kind of changes might it be? For example, new emails, messages or other notifications.
Otherwise, you can use polling (send a request every second to check the status of the server). But WebSocket has more advantages. Firstly, there is only one connection between the client and the server with WebSocket. You don’t waste time and resources for reopening this connection for every request. Secondly, you reduce network traffic by using this protocol. Also, communication is asynchronous. The client doesn’t wait for the response from the server; he makes a request and continues his work.
You can send a text or binary data over WebSocket.
Often, this protocol is used by browsers to interact with users in chat apps, online games or analytics tools. But we’ll create a console client.
The communication consists of two parts: handshake and bidirectional messaging.

WebSocket handshake
Let’s take a look at the protocol handshake.
To establish a WebSocket connection, the client sends an HTTP request with the Upgrade header.
GET /?encoding=text HTTP/1.1
Host: echo.websocket.org
User-Agent: Mozilla/5.0 (X11; Ubuntu; Linux x86_64; rv:81.0) Gecko/20100101 Firefox/81.0
Accept: */*
Accept-Language: en-US,en;q=0.5
Accept-Encoding: gzip, deflate, br
Sec-WebSocket-Version: 13
Origin: https://www.websocket.org
Sec-WebSocket-Extensions: permessage-deflate
Sec-WebSocket-Key: S2mhR/NMcgw9jD5mLfrDbQ==
Connection: keep-alive, Upgrade
Pragma: no-cache
Cache-Control: no-cache
Upgrade: websocket
If the server is able to establish a WebSocket connection, he responses with the Upgrade header and communication switches to the new protocol over the underlying TCP connection.
HTTP/1.1 101 Web Socket Protocol Handshake
Access-Control-Allow-Credentials: true
Access-Control-Allow-Headers: content-type
Access-Control-Allow-Headers: authorization
Access-Control-Allow-Headers: x-websocket-extensions
Access-Control-Allow-Headers: x-websocket-version
Access-Control-Allow-Headers: x-websocket-protocol
Access-Control-Allow-Origin: https://www.websocket.org
Connection: Upgrade
Sec-WebSocket-Accept: y8WR5PEjq1JCLrEKj485mWJHPZA=
Server: Kaazing Gateway
Upgrade: websocket
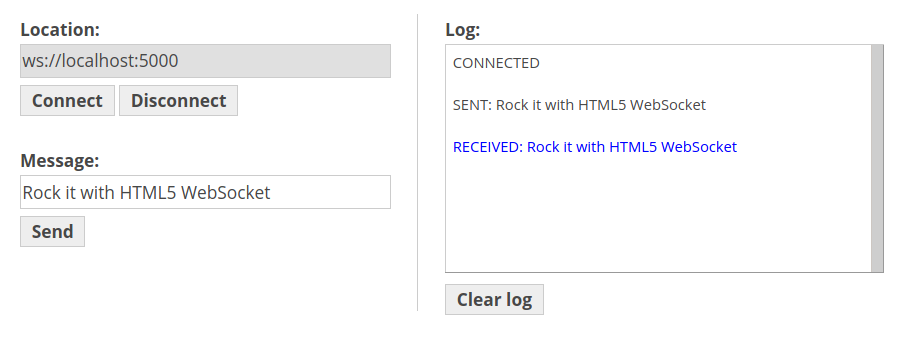
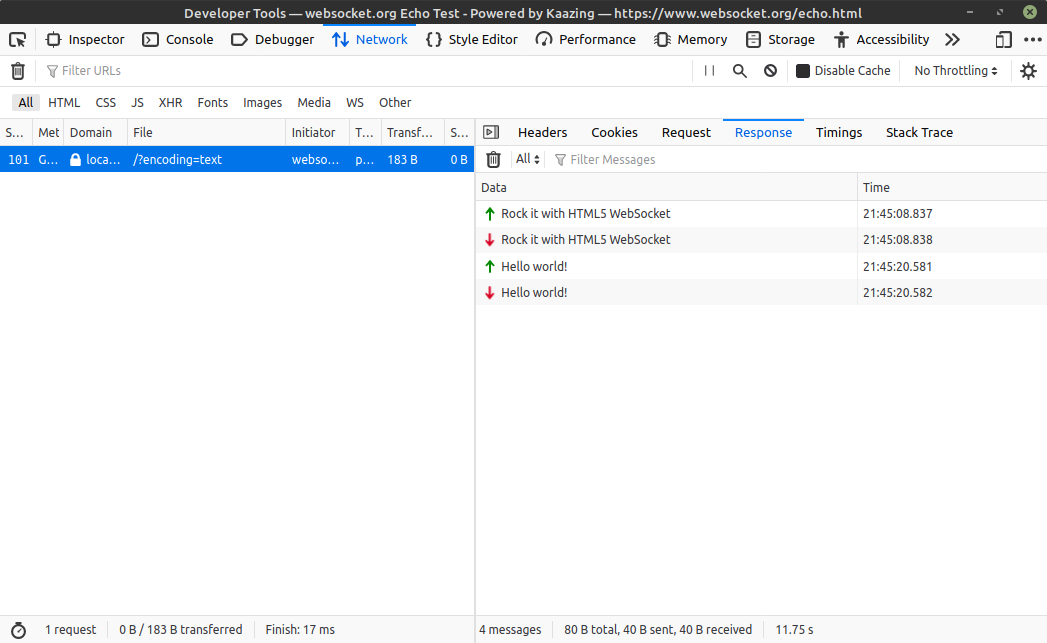
You can test this handshake from your browser on the demo page.
After the handshake, we send and receive messages via data frames. Message can be split across several frames. Each frame has a small header.
Sample project
Now, let’s build an example. We’ll start with a server app.
Disclaimer: if you want to create a real-time application for the production, there is a SignalR library that may help you. It has a lot of handy methods, which makes it preferable to use rather than raw WebSockets.
Server
Create an ASP.NET Core project:
$ dotnet new web
Remove everything except project file, Program.cs and Startup.cs.
To use a WebSocket connection, we need to add a particular middleware to the pipeline.
app.UseWebSockets();
After that, let’s configure an endpoint.
app.UseRouting();

app.UseEndpoints(endpoints =>
{
    endpoints.MapGet("/", async context =>
    {
        if (context.WebSockets.IsWebSocketRequest)
        {
            var webSocket = await context.WebSockets.AcceptWebSocketAsync();
            await Echo(webSocket);
        }
    });
});
We’ll handle an incoming message in the Echo(webSocket) method. It’s going to be a straightforward echo server, so all we have to do is read the message and send it back.
private async Task Echo(WebSocket webSocket)
{
    var buffer = new byte[1024 * 4];
    var result = await webSocket.ReceiveAsync(new ArraySegment<byte>(buffer), CancellationToken.None);
    while (!result.CloseStatus.HasValue)
    {
        await webSocket.SendAsync(new ArraySegment<byte>(buffer, 0, result.Count), result.MessageType, result.EndOfMessage, CancellationToken.None);

        result = await webSocket.ReceiveAsync(new ArraySegment<byte>(buffer), CancellationToken.None);
    }
    await webSocket.CloseAsync(result.CloseStatus.Value, result.CloseStatusDescription, CancellationToken.None);
}
And we’re done. Here is the complete Startup class.
public class Startup
{
    public void Configure(IApplicationBuilder app, IWebHostEnvironment env)
    {
        app.UseWebSockets();

        app.UseRouting();

        app.UseEndpoints(endpoints =>
        {
            endpoints.MapGet("/", async context =>
            {
                if (context.WebSockets.IsWebSocketRequest)
                {
                    var webSocket = await context.WebSockets.AcceptWebSocketAsync();
                    await Echo(webSocket);
                }
            });
        });
    }

    private async Task Echo(WebSocket webSocket)
    {
        var buffer = new byte[1024 * 4];
        var result = await webSocket.ReceiveAsync(new ArraySegment<byte>(buffer), CancellationToken.None);
        while (!result.CloseStatus.HasValue)
        {
            await webSocket.SendAsync(new ArraySegment<byte>(buffer, 0, result.Count), result.MessageType, result.EndOfMessage, CancellationToken.None);

            result = await webSocket.ReceiveAsync(new ArraySegment<byte>(buffer), CancellationToken.None);
        }
        await webSocket.CloseAsync(result.CloseStatus.Value, result.CloseStatusDescription, CancellationToken.None);
    }
}
Now, let’s test our server with echo tool.
Client
To build a client, create a new console application.
$ dotnet new console
I’m going to use external nuget package Websocket.Client.
Install this package with the following command.
$ dotnet add package Websocket.Client --version 4.3.21
And modify the Program class.
class Program
{
    static void Main()
    {
        using var client = new WebsocketClient(new Uri("ws://localhost:5000/"));
        client.MessageReceived.Subscribe(msg => Console.WriteLine($"Message received: {msg}"));

        client.Start();

        Console.WriteLine("Type a message:");
        var message = Console.ReadLine();
        client.Send(message);

        Console.ReadKey();

        client.Stop(WebSocketCloseStatus.NormalClosure, "Status");
    }
}
Firstly, we create a new instance of WebsocketClient and subscribe to the new messages. Secondly, start the client and send a user input. As a result, you should receive the same message that you sent to the server.
Conclusion
Today we’ve looked at the WebSocket protocol. I’ve shown you some details about the protocol, and we’ve created a client-server app. I hope it was interesting.
Here you can find a sample project.
References
Image: Photo by Brina Blum on Unsplash
Comments